
Customer.io just launched its Data Pipelines, and it is precisely what you need!
Customer.io Data Pipeline is a new addition that can change the entire data pipeline game. Managing data can be a challenging task, and Customer.io has long been addressing this issue by incorporating data-centric features such as Reverse ETL and integrations with Mixpanel/Amplitude into their cross-channel messaging product, now known as Journeys.
To further enhance their offering, they have recently introduced Customer.io Data Pipelines (CDP), a solution that seamlessly connects your customer data with every product in your tech stack.
In this blog post, we will demonstrate how your team can leverage CDP to expedite the integration of new and existing tools, enhance data accuracy throughout your entire system, and combine it with Customer.io Journeys products to create the ultimate omnichannel experience for your customers.
What is Customer.io Data Pipeline (CDP)?
CDP, or Customer.io Data Pipelines, empowers you to gather data from multiple sources and transmit it to specific destinations, enabling you to take action for purposes such as analytics, marketing automation, and more.
With CDP, your team can achieve the following:
a. Obtain a consolidated perspective of your customers – efficiently process, modify, & direct data to and from various sources & destinations without extensive coding.
b. Make well-informed decisions with complete data reliability – rapidly incorporate historical data and ensure accuracy across your entire system using ETL and Reverse ETL.
c. Foster personalized customer engagement – harness your data to initiate, convert, and retain users through omnichannel campaigns that align with significant milestones in your customer journey.
Why use Customer.io Data Pipelines?
Customer.io Data Pipelines fulfil two primary functions within your technology stack:
a. They simplify the process of connecting your data sources to the destinations where you leverage your data, eliminating the need to invest valuable time & resources in managing intricate integrations.
b. Customer.io Data Pipelines safeguard you from being tied down to specific vendors by granting you unrestricted access to & full autonomy over your data.
To begin, you will have to configure your Sources, which refer to websites or servers from which you wish to gather data. Upon setting up a source, you will install one of Customer.io’s source libraries and utilize it to transmit data to the CDP. Subsequently, you can direct this data to one or multiple destinations. If you make use of Customer.io Journeys, you have the capability to automatically transmit Customer and Message events to the CDP, allowing you to relay this information to destinations. By default, Customer.io forwards all feasible messaging events to the CDP.
Once you have established your sources, Customer.io takes charge of transforming and directing the data to multiple Destinations. A destination refers to a specific location where you intend to transmit data. With Customer.io, you have the capability to automatically modify the data to match the requirements of each destination, simplifying the process of sending data from one or more sources to a destination without the need for custom coding. You can directly feed data from various sources into your workspace, by leveraging Customer.io Journeys. As a destination, you can seamlessly incorporate individuals into your workspace and dispatch events to Customer.io Journeys based on data from external sources, eliminating the need for complex integrations with third-party products.
All data sources consistently deliver data in a uniform structure and format. Regardless of the sources you integrate, you will always be aware of the necessary calls to make and the expected output. Additionally, Customer.io offers a predetermined set of actions for each destination, automatically formatting your source data to align with the requirements of the destination. Therefore, unless you have a specific preference to tailor the data mapping for your destinations, there is no need to familiarize yourself with the APIs of the destinations. Furthermore, if customization of actions is desired, Customer.io presents them in plain text, facilitating comprehension and manipulation compared to conventional API calls.
Having the capability to resend data helps avoid being tied to a particular vendor.
Although the customer.io data pipeline simplifies the process of connecting new sources & destinations, that alone does not fully prevent vendor lock-in. Historical data is one of the key factors that can lead to vendor lock-in. Losing valuable data stored in a specific service and the challenge of exporting it to a new service can be a significant hurdle in transitioning away from a vendor.
However, Customer.io retains your source data indefinitely. If you are subscribed to a premium or enterprise plan, you have the ability to resend your historical data to different destinations. This implies that when you decide to transition from one service to another, you can effortlessly add a new destination, establish connections with your sources, and replay your past data to the new destination. As a result, every new destination gains access to your complete historical data, eliminating the need to start from scratch and enabling you to leverage services that align best with your business needs.
How to set up your Customer.io Data Pipeline (CDP)?
The subsequent steps outline the fundamental process you will undertake to establish your CDP. This will aid in gaining a clearer comprehension of the overarching tasks you must complete to initiate and operationalize your system.
1. Add a source
To gain insights into your customer base and their product usage, you will incorporate sources that collect relevant data. Establish a separate source for each website or application you intend to monitor and analyze.
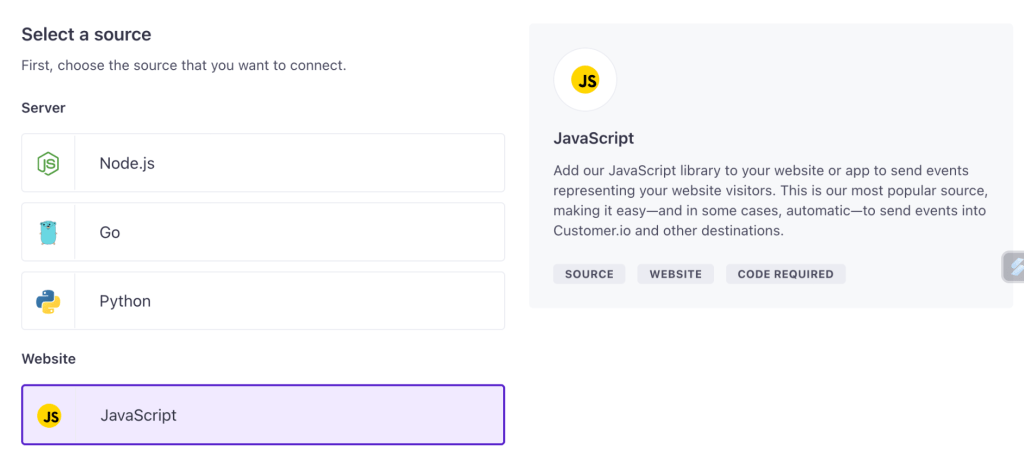
In this scenario, we will proceed with adding the JavaScript source to your website.
a. Access the CDP tab and navigate to the Connections page. Under Sources, select Add New.
b. Choose the JavaScript source option and click on Add Source.
c. Provide a Name for the source and click Submit. It is recommended to assign a name that not only denotes the source medium but also helps identify the specific resource from which data is being captured. For example “company website” or “pop-up forms.”

d. Locate the JavaScript snippet within the Installation Instructions. Copy this code and insert it into the <head> tag of your website.
You have successfully configured your website to capture data.
2. Create a Page Call
Proceed to the website where you added the JavaScript snippet as instructed earlier and navigate through several pages. Return to Customer.io and access the API Calls tab of your source. You should observe page events recorded. Each page event signifies a page view, representing a specific page that visitors have accessed on your website or app. The JavaScript snippet automatically captures these page events without any manual intervention.
Nevertheless, the captured events remain anonymous at this stage. To establish a connection between this anonymous data and known individuals, you must configure identify calls and other events. This association can be achieved when individuals provide their email addresses through a form or when they login to your website, among other methods. It is important to note that while your data sources may vary, Customer.io’s event types remain consistent. Therefore, you have the ability to capture the same events, or a subset thereof, from the supported sources.

3. Add a destination
You have the flexibility to designate any of your sources as a destination like your analytics platforms, CRMs, support tools, or other marketing platforms. Customer.io facilitates the transformation of data from your sources to conform to the specific formats required by your chosen destinations.
To set up your destination, follow these steps:
a. Access the CDP tab and navigate to Connections.
b. Click on Add New under Destinations.
c. Choose your desired destination.
d. Select the JavaScript Source option, allowing you to transmit data from your website (using the JavaScript source) to the newly selected destination.

e. Configure your destination by adjusting the specific settings. Each destination offers unique configuration options based on factors such as authentication methods and supported event types.

f. Finally, click on Enable Destination to activate the connection.
Upon revisiting your website and refreshing a page, you will immediately witness the flow of data. These incoming data points correspond to anonymous page events, specifically pageviews. However, to fully leverage the potential of data within your destination, it is essential to incorporate the identify method. By integrating identity, track, and other relevant calls into your website, you can maximize the benefits offered by the CDP and transmit actionable data to your designated destinations.
4. Verify your implementation
To validate your implementation, navigate to the Actions tab within a specific source or destination. In these tabs, you can observe the individual events originating from your source and the corresponding calls executed by Customer.io towards your destination. Utilize these tabs to ensure that your source events are correctly configured and appropriately mapped to the intended destination. These pages provide real-time or near-real-time updates, displaying events as they occur in a nearly live-stream fashion.

Sourcing API calls mapped to Actions
API calls are received from your sources and, if they meet the Trigger and Filter conditions specific to your destination, Customer.io will execute an action that sends data to the designated destination. Actions possess several properties:
a. Action/Type: Specifies the type of action to be executed at the destination.
b. Filter/Trigger: Defines the criteria that source events must satisfy in order to trigger the associated action.
c. Mappings: Dictates the data mapping process, wherein data from your source is mapped to the corresponding fields in the destination.
Mapping Source Data to Destinations: Understanding Events & Actions
The API Calls tab of your source records a sequence of API Calls captured by your source. These calls are generated either through Customer.io’s JavaScript client library or their server-side libraries and reflect the actions performed by individuals on your website or within your app. For instance, when you initiate the identification process for a person, you will observe an incoming identify call within your source. You have the option to review these events in order to verify that you are accurately sending the desired information to Customer.io.
Upon configuring a destination, you will have access to an Actions tab. Within this tab, an action refers to an event that Customer.io automatically associates with your chosen destination. It is possible to modify the default actions and the mapping of events to your destination through the Mappings tab. While it is generally advisable to adhere to the default actions provided, customization options are available if desired. For instance, you may opt to filter out specific calls from certain destinations based on your requirements. If you wish to modify the default actions, simply navigate to your destination’s Actions tab. From there, you can easily toggle actions on or off and adjust the data structure associated with each action. This allows you the flexibility to customize the actions according to your specific requirements.

When should you change filters/triggers?
By modifying a filter, you can control the timing of data sent to your destination through Customer.io. Adjusting a filter allows you to limit the instances in which data is transmitted to the destination. For instance, many destinations include an “Identify User” action triggered by an identify call. If your destination relies on an email trait, you can modify the filter to ensure that identify calls are only sent when they include an email trait.

When is it necessary to modify the mapping of data structures?
Modifications to mappings are required when there is a mismatch between your source data and the actions expected by your destination. For instance, if you consistently capture additional traits in your identification calls from sources, and your destination requires a phone number instead of an email trait, you may need to introduce a new mapping that triggers an identification call when a phone number is tracked instead or in addition to emails.

Pricing of Customer.io Data Pipeline
Customer.io data pipeline offers three pricing plans, with the Essential Plan starting at $100 per month. As for the other two plans, you can request a demo to obtain further information. Now, let’s delve into these three plans with a closer look.
1. The Essentials plan is designed for startups and small teams that actively interact with customers on their mobile and web applications.
2. The Premium plan is suitable for high-growth companies that desire increased control over their messaging outcomes.
3. The Enterprise plan is designed for companies operating at a large scale, aiming to deliver exceptional customer experiences.

Still not sure how to incorporate Customer.io Data Pipeline into your system? Talk to our CDP Expert to gain more clarity!