
6 essential Hubspot workflows for SaaS companies
HubSpot offers the powerful feature of workflow to enable automation from within the HubSpot CRM. HubSpot users can utilise HubSpot Workflows to build custom logic to automate otherwise mundane tasks depending on a user’s behaviour or activity. This improves customer journeys while also significantly reducing manual labour and increasing efficiency.
SaaS companies that use HubSpot can optimise their customer experience, from the first interaction through retention, using HubSpot Workflows, resulting in higher recurring revenue and loyal customers. Overall, HubSpot Workflows is an effective solution for streamlining your sales, marketing, & customer relation operations and accelerating business growth. Let’s look at the top six examples to assist you with HubSpot Workflows and save up the time that your workforce spends on monotonous activities.
What are Hubspot workflows?
HubSpot Workflows is a graphical automation tool that assists companies in creating workflows that implement automation for repetitive processes and allow them to expand their operations while maintaining quality. The platform has an interface with drag-and-drop functionality which enables users to easily construct and manage processes. A variety of events, including submissions of forms, email opens, and page views, can trigger workflows. When activated, workflows can execute a variety of operations such as sending emails, altering contact data, generating tasks, and more.
Utilizing HubSpot Workflows enables the development of personalized and targeted marketing campaigns that prompt based on a user’s behaviour or activity, which is one of its primary benefits. This enables companies to interact with their potential clients and consumers more meaningfully, resulting in increased conversion rates & improved retention.
HubSpot Workflows also gives organisations significant insights into customer behaviour, allowing them to make data-driven choices that result in more efficient sales and marketing approaches. Companies can optimise their whole customer journeys by tracking user behaviour & interaction. Overall, this is a strong automation platform that can assist companies of all sizes in streamlining processes, increasing efficiency, and driving growth.
What are the benefits of HubSpot Workflows for SaaS Companies?
HubSpot Workflows can assist your organization save money and time while increasing qualified conversions. Let’s go through the six key advantages of workflows that you can use to your advantage.
1. Better Team Collaboration: By offering a centralized platform for communication & task management, HubSpot Workflows enables teams to interact more efficiently. Workflows allow your team to track project progress and make sure every team member is on the same page, resulting in improved collaboration and more rapid decision-making.
2. Customization: HubSpot processes enable you to develop custom workflows tailored to your business requirements, providing customization options. The platform offers a variety of customizable templates and tools for automating certain processes, allowing your organisation to develop workflows that are relevant to your operations.
3. Marketing Insights: HubSpot Workflows offers powerful marketing analytics that enables SaaS companies to analyse the effectiveness of their campaigns & discover areas for improvement. The platform collects information on user interactions, conversion rates, & revenues, allowing businesses to make decisions based on data and optimise their marketing efforts.
4. Lead Segmentation: You can utilise HubSpot Workflows to segment leads according to their behaviour and activities, helping you to target particular audiences with personalized marketing. This improves the relevancy of your marketing communications, resulting in increased interaction and conversion rates.
5. Increased Customer Retention: These Workflows can automate customer retention initiatives like signups and follow-up communications. This enhances customer experiences and increases loyalty, resulting in more revenue & an increased lifetime value for every customer.
6. Integration with Other platforms: HubSpot Workflows interfaces with a variety of other products, including CRM platforms, marketing automation systems, and project management tools. You can simplify your processes and boost productivity by linking your workflows to other business-critical platforms.
What’s the usual structure of every Hubspot workflow?
No matter what kind of workflow you want to create in HubSpot, the structure of building these workflows remains the same. By following the steps given below, you can create powerful workflows that automate your processes and drive business growth.
1. Determine the Kind of Workflow Required
Standard: This sends emails whenever the trigger requirements of a workflow are met. Delays are determined by when an individual is enrolled.
Fixed: This activates contacts whenever they fulfil the workflow’s initial requirements. Delays are predetermined and based on a specific date.
Property-Based: You must pick a date-type property for this process, and any delays you specify within this workflow are based on the date value specified on the contact’s record.

2. Configure Your Workflow’s Starting Conditions
Manual: This option allows you to configure your workflow to do the tasks you want and then manually register contacts in the workflow. Selecting this alternative will not enrol any contacts until you specifically request it.
Automatic: This is going to automatically enrol contacts as they match the workflow criteria. You’ll be asked to choose the criteria that your contacts must match to be eligible for joining the workflow.

3. Examine Your Action Items
After you’ve chosen your workflow type, set your starting conditions, and added your goal list, you can start including actions in your process. Individual functions that run as a component of a workflow, like sending emails, incorporating a delay among actions, or creating a contact property value, are referred to as actions. You can include a variety of activities in your workflow. Here’s a short rundown of the most important ones:
Branches: Branching logic allows you to direct your contacts to take one of two paths based on an activity in your workflow. For instance, if you send a lead an email, you can have them get different material based on whether they select options A or B.
Delays: Whenever a delay is introduced to a normal process, it is in relation to the prior activity. When an action is completed, a subsequent action is planned. If that action faces a delay, the process will wait the same amount of time taken before proceeding to the next step.

4. Make use of Advanced Workflow Options
When designing a workflow, you can decide if it needs to be more specific in terms of logic and what it allows and does not allow. Workflow parameters can help you manage the behaviour of your workflow.
Before you start your workflow, ask yourself the following questions:
a. Should contacts be able to access their workflow several times?
b. Can the workflow steps only run on working days or within a specific time frame?
c. Is there any contact you don’t want to be included in this workflow?
5. Analyse Your Results
Goal Lists: One distinct feature of HubSpot’s Workflows is its capacity to track your workflow’s progress towards a certain goal. Setting a target list will be essential for many of your workflows since it will allow you to assess how your workflows measure up. When your workflow remains active for a while, you should evaluate its effectiveness.
Actions: Each stage will provide a little bit more about an action’s engagement, allowing you to know if individuals in your workflow are interacting with your emails, if they are running in a delay, or have satisfied the workflow’s target criteria.

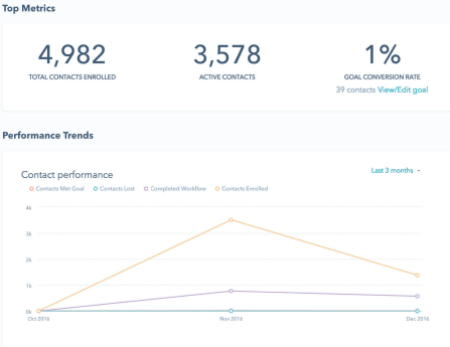
Performance: This page indicates your contact and email performance for each particular workflow. First, you’ll obtain a short summary of your workflow’s effectiveness in terms of conversion rate. Then, you’ll find the section titled Performance Trends, which displays a graphical illustration of the number of individuals who have registered in your workflow, finished it, disappeared, and met the goal during any time period. You can utilise the date filter to view a certain date range to get a better picture of how the workflow has fared over time.
6. Make use of HubSpot’s testing tools
You can test your process before activating it to see the order of steps in action. When you test a workflow, it sends your experimental contact through the workflow, giving you a view into how it works and insights into any spots where you might have overlooked a step.
Essential workflows that every SaaS company should have
With HubSpot, you can create numerous workflows in accordance with your company’s requirements. In this section, we will be discussing how to create some of the most basic but essential workflows that every SaaS company should avail.
1. Internal notification on Slack every time a new Enterprise lead arrives
By following the steps below, you can automate your internal communication and ensure that your team stays informed about new leads.
1. Build a New Workflow: In HubSpot, the primary step is to build a new workflow. Select “new business leads” to act as the workflow’s trigger.
2. Add an Action: After you’ve constructed the workflow, create an action for sending a webhook. A webhook is a means for HubSpot to communicate data to external platforms, like Slack.
3. Setup a Webhook: Next, in Slack, build a Webhook. When a “new Business lead” arrives, HubSpot will be able to communicate data to Slack. To make a webhook, navigate to the Slack App Directory & browse for “Incoming WebHooks.” Follow the on-screen instructions for creating a brand-new webhook & copy the webhook link.

4. Set up the Webhook Action: Set up the webhook action in HubSpot by entering the URL of the webhook you have created into the relevant area. Personalise the message by including details regarding the Enterprise lead, like their name & company.
5. Validate the Workflow: Run the workflow to confirm whether the webhook is correctly transferring data to Slack. Make a test Business lead and check to see if the message is visible in the appropriate Slack channel.
6. Launch your Workflow: Once you’re sure the workflow is operating properly, start it to send notifications anytime a new Business lead comes in HubSpot.

2. Geography-based lead assignment to owners
Here is a detailed process on how to create a geography-based lead assignment to owners in HubSpot workflow:
1. Build a Contact Property: The initial phase is to build a contact property in HubSpot based on the contact’s geographical location. This might be a city, a state, a region, or the entire nation. Check to see if the contact property is accessible in the record of the contact and if it can be utilised for lead assignment.
2. Set up a Contact-Based Workflow: In HubSpot, build a new contact-based workflow. As the workflow’s trigger, utilise the geographical location of the contact property.

3. Add an Action: After creating the workflow, create an action for delegating the lead to a team member. As the lead assignment criterion, consider the geographic location of the lead as an attribute. As an example, if a lead is in London, assign it to a team member who is already dealing with customers in London.
4. Set Action: Specify the action to allocate the lead to the right team member. You can distribute leads evenly across your staff, or you can allocate leads depending on a specified set of parameters, such as experience or expertise.

5. Testing your Workflow: Run the workflow to confirm that leads are accurately distributed depending on geography. Create test leads in various geographic regions and ensure that they are assigned to the relevant people.
6. Launch the Workflow: After you’ve confirmed that the workflow is functioning properly, start it to begin automatically allocating leads depending on geography.
3. Step-based nurture emails for all leads who attended a webinar
Let’s check out a detailed process on how to create step-based nurture emails for all leads who attended a webinar.
1. Establish a List: First, establish a HubSpot list that comprises all of the webinar attendees. Utilise the “attended webinar” attribute as the list’s criterion.
2. Set up a Workflow: In HubSpot, build a new workflow and employ the list you prepared as the workflow’s trigger.

3. Add a Delay: After you’ve constructed the pipeline, add a delay of a couple of days to allow the lead time to fully absorb the details of the webinar.

4. Include an Email Action: Subsequently incorporate an email action that will send a nurturing email to these leads over the course of many weeks or months. You can utilise a pre-designed email format that offers webinar information and extra resources to assist leads in continuing their learning about this webinar.
5. Add Additional Delays: Following the emails that are being sent, add a few days between every subsequent email. This will save leads from being overwhelmed and will allow them time to respond to each email.
6. Personalise the Emails: Use the lead’s name and other pertinent data in the subject & body of the email to tailor the emails. This will assist in enhancing interaction and personalising communications.

7. Validate the Workflow: Validate the workflow by generating a test lead and ensuring that all the personalisations in the emails are working & they get the initial and following emails at the right intervals.
8. Launch the Workflow: When you’re sure the workflow is operating properly, start sending nurturing emails to all prospects that attended the webinar.
4. Update the disqualification reason property when the lead status is marked as disqualified
In this part, we’ll find out how to manage leads that have been excluded by the sales staff in HubSpot Workflow.
1. Set Up a Contact Property: Initially, you have to set up a contact property in HubSpot in order to maintain the reason for the disqualification. This can be a single-line text or a multiple-choice property, depending on what fits your needs.

2. Establish a Contact-based process: In HubSpot, build a new contact-based process. Utilise the “lead status changes” trigger and pick “disqualified” as the workflow status.

3. Add an Action: After creating the workflow, create an action to change the exclusion reason property. Choose the disqualification reason property as the property to update and use the “set a property value” action.

4. Configure the Action: Set the action for updating the disqualification reasons property with the explanation for the lead’s exclusion. You can either utilize a predetermined list of causes or enable users to input their own.
5. Test & Launch the Workflow: Run the workflow by excluding a test lead and verifying the disqualification reason attribute is correctly updated. Once you’re confident that the workflow is functioning properly, launch it to begin automatically updating the disqualification reason property for leads that have been marked as excluded.
5. Tasks for follow-up when a lead becomes an opportunity
Let’s go through how to follow up with disqualified leads in HubSpot workflow after it turns into an opportunity.
1. Make a List: The initial step is to make a list in HubSpot of all the leads that are potential opportunities. As the list’s criteria, utilise the “lead status” & “lifecycle stage” attributes.
2. Set up a Workflow: In HubSpot, construct a new workflow and utilise the list you prepared as the workflow’s trigger.

3. Include a Delay: After creating the workflow, including a delay of some days to provide the sales team with time to analyze the opportunity and select the most appropriate course of action for them.

4. Create a Task Action: Create a task action to delegate a task to the sales professional in charge of the opportunity. The task ought to include lead and opportunity details as well as a reminder to the sales professional to follow up with the prospect.

5. Test and launch the Workflow: Run the workflow through its paces by establishing a test lead and opportunity & making certain the follow-up email & task are generated at the right intervals. Once you’re confident that the workflow is functioning properly, activate it. Then you can begin sending follow-up emails and generating tasks for all leads who turn into opportunities after being disqualified.
6. Nudge blog subscribers to book a demo using follow-up emails
Here is a detailed process on how to nudge blog subscribers to book a demo using follow-up emails in the HubSpot workflow:
1. Set up a List: The first thing to do is to establish a HubSpot list. This list should contain all of the blog subscribers who are yet to book a demo. As per the list’s criteria, select the “blog subscriber” & “demo booked” properties.
2. Create a Workflow: In HubSpot, build a new workflow and utilise the list you prepared as the workflow’s trigger.

3. Add an Email Action: After you’ve built the workflow, add an email action for sending a follow-up email to each blog subscriber. The email ought to contain a call to action to schedule a demo. You should also emphasize the positive aspects of the product or service in this section.

4. Add a Delay: Delay sending the second email for a few days. This is to allow the subscriber time to examine the proposition and to avoid overloading them by sending too many emails.

5. Include a Second Email Action: Provide a second email action that will be sending a follow-up email to each blog subscriber. This email should offer additional details regarding the good or service in question. It should also contain another call to action to schedule a demo.
6. Include a Task Action: Include a task action to remind the sales agent in charge of the subscriber. So that they can follow up with them if they have not yet scheduled a demo after the second email.
7. Personalise the Emails: Use the subscriber’s name along with other pertinent details in the subject line & body of the email to tailor the emails. This will assist in enhancing communication and engagement.

8. Validate the Workflow: Verify the workflow by setting up a test blog subscriber & ensuring that follow-up emails and tasks are generated at the right intervals. Once you’re satisfied that the workflow is running properly, activate it. Then it will begin delivering follow-up emails and generating tasks for all blog subscribers who haven’t yet scheduled a demo.
Finally, SaaS organisations that want to streamline and automate their marketing, sales, & customer service activities must use HubSpot workflows. You can gain from our knowledge and experience in building and executing customized processes. These workflows will be geared to your individual company needs by hiring us to assist with your HubSpot workflows. Our team of experts can help with anything from process design to establishing triggers, actions, & conditions. In addition to testing and optimising workflows for the best outcomes. You can save time and money, boost efficiency, and eventually increase revenue while achieving long-term sustainable growth by doing so.